Converting an iPhone photo to JPG looks like the most solved problem on the internet. Drop in a HEIC, get a JPG. But the file that comes back is not the same from one tool to the next, and the differences are ones you cannot see in a thumbnail: whether the colours are still the colours your phone captured, and whether the photo still knows when and where it was taken. We ran the same iPhone photo through six free converters and measured what came out.
Disclosure: this blog is published by RedPanda Compress, which is one of the tools tested. It went through the same procedure as the others. It also failed one of these tests when we first ran it — more on that below, because it is the most useful thing in this article.
The short answer
- Almost everyone gets colour right. Five of the six kept the photo’s Display P3 colour profile and came back within a fraction of a shade of the original. FreeConvert was the exception, and its output is visibly duller.
- Four of the six hand back your GPS coordinates. heictojpg.com, iLoveIMG, CloudConvert and Picflow copy the entire metadata block through, location included. That is exactly right for archiving and exactly wrong for a photo you are about to post.
- Nobody except us lets you choose. Every other converter here has one fixed behaviour. RedPanda Compress asks: remove everything, keep the date and camera, or keep the lot.
- If you just want the best-looking JPG: any of the five that keep the profile will do. The measured difference between them is far smaller than the difference between keeping the profile and dropping it.
How we tested
- The file: a 1280×720 HEIC built from a frame of Big Buck Bunny (CC-BY, Blender Foundation) — the same source as our video compressor comparison — tagged Display P3 like an iPhone photo, carrying a full metadata block: camera make and model, lens, date taken, ISO, aperture, shutter speed and GPS coordinates. Eight mid-saturation colour patches are laid into the image so the colour can be measured rather than eyeballed.
- Defaults only. We changed nothing. The point is what happens when you don’t open the options panel.
- How colour was measured: each patch in the returned JPG was compared with the original using ΔE2000, the standard measure of how different two colours look. Below about 1 nobody can see a difference; around 2 a careful eye can; above 4 it is obvious side by side.
- How metadata was measured: exiftool, checking each field individually rather than trusting a “metadata preserved” claim.
- Which tools: the free web converters ranking for “heic to jpg” in US organic search — a term with around 246,000 searches a month in the US alone, and 1.2 million worldwide. Four more are listed at the end with the reason we could not measure them.
Test 1: do the colours survive?
An iPhone photo is tagged Display P3 — a wider range of colours than the old sRGB standard that most of the web assumes. The numbers inside the file only mean the right colour if the file also carries the label saying “read these as P3”. A converter has two correct options: copy that label through, or convert the numbers to sRGB so the picture still looks the same. The one wrong option is to keep the numbers and throw the label away, which leaves everything reading as more saturated than it should.
| Tool | Colour profile | Colour error (ΔE) | Output size |
|---|---|---|---|
| RedPanda Compress | Display P3 kept | 0.15 avg / 0.38 max | 102 KB |
| iLoveIMG | Display P3 kept | 0.15 avg / 0.38 max | 135 KB |
| CloudConvert | Display P3 kept | 0.15 avg / 0.38 max | 135 KB |
| Picflow | Display P3 kept | 0.15 avg / 0.38 max | 79 KB |
| heictojpg.com | Display P3 kept | 0.20 avg / 0.62 max | 79 KB |
| FreeConvert | none | 2.56 avg / 4.56 max | 131 KB |
Five tools land in a dead heat, essentially at the limit of what the format allows. The sixth is in a different category, and it is visible:
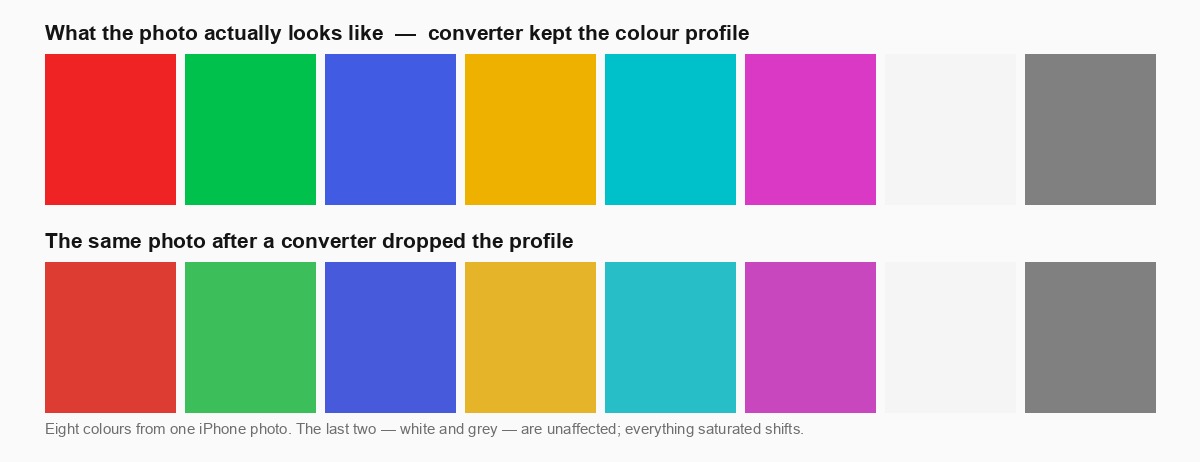
This is not a subtle difference in a laboratory. Skies, skin tones and anything brightly coloured come back wrong, and because the file carries no profile at all, no amount of later editing tells you what the original was.
Test 2: does the photo still know when and where it was taken?
Inside every iPhone photo is a metadata block: the date and time, the camera and lens, the exposure settings, and — if location services were on — the GPS coordinates, accurate to a few metres. What a converter does with that block is a real decision, and the six tools split three ways.
| Tool | Date taken | Camera & lens | GPS location |
|---|---|---|---|
| heictojpg.com | kept | kept | kept |
| iLoveIMG | kept | kept | kept |
| CloudConvert | kept | kept | kept |
| Picflow | kept | kept | kept |
| FreeConvert | removed | removed | removed |
| RedPanda Compress | your choice — remove all (default), keep date & camera, or keep everything | ||
Neither of the fixed behaviours is wrong in itself; they are right for different photos. Keeping everything is what you want when you are converting a holiday album that should still sort by date in Google Photos. Removing everything is what you want before a photo goes onto a public listing, a forum or a dating profile, because otherwise you are publishing the coordinates of wherever you took it. The problem is that a tool with one fixed behaviour is always wrong for half the jobs, and it does not tell you which half you are in.
The part where our own tool failed
When we first ran this test, RedPanda Compress was the tool in the bottom row of that colour comparison. Our converter was writing out Display P3 pixel values under an sRGB label — exactly the mistake described above — and measured 2.56 ΔE, the worst in the group alongside FreeConvert. It also removed all metadata with no way to keep any of it.
We fixed it. The colour profile is now copied into the JPG, and the metadata is a choice with three settings. Re-measured with the same fixture and the same script, the output is 0.15 ΔE — tied with the best in this comparison and slightly ahead of heictojpg.com. The image data itself did not change by a single pixel value.
We are telling you this because it is the honest way to publish a comparison you appear in, and because it is a useful warning: this defect is invisible unless you go looking for it. It produces a perfectly valid JPG that opens everywhere and looks fine on its own. You only see the problem next to the original.
Tool by tool
heictojpg.com: the fastest route if you have a big pile
The best-known name for this job, and it earns it: colour and metadata both came through intact, and it takes up to 200 photos at a time. The output was the smallest in the test at 79 KB, achieved with noticeably more aggressive compression than the others — fine for sharing, slightly less so if you are archiving. Your photos are uploaded to their servers.
Picflow: the same correctness, without the upload
Picflow converts inside your browser — we checked the network traffic and nothing left the machine — and still kept the colour profile and the full metadata block. That combination is worth noting, because “we run locally” is often used as an excuse for losing things. It handled 100 twelve-megapixel photos without complaint, at about 2.8 seconds each, though its memory use climbed to around 600 MB doing it, which is the sort of thing that decides whether a phone survives the job.
One thing to know: given an image with a transparent region, Picflow discards the transparency and writes out whatever pixels were underneath. If you have erased part of a photo, the erased part comes back.
CloudConvert and iLoveIMG: correct, generous, and larger files
Both got everything right and both produced a 135 KB file — noticeably larger than the rest, because they encode full-resolution colour information that the HEIC did not contain in the first place. Neither measured better for it. CloudConvert has by far the best options panel of the group if you want to override anything, and caps free use at 10 conversions a day. iLoveIMG has no such cap and sits alongside the rest of its image toolbox.
FreeConvert: the one to avoid for photos
FreeConvert returned a JPG with no colour profile at all and no metadata: 2.56 ΔE average, 4.56 at worst, and a file that has lost both the information needed to display it correctly and the record of when it was taken. For a screenshot none of this matters. For a photograph, it is the worst outcome in this comparison. It is otherwise a capable converter with a large format list — this specific job is not where it is at its best.
RedPanda Compress: nothing is uploaded, and you pick the metadata
The conversion runs in your browser, so the photos never leave your device — no upload wait, no queue, no copy sitting on a server. Colour measured 0.15 ΔE, tied for best here, and the JPG itself was the most faithful to the original of any tool in the test. Metadata is a three-way choice, defaulting to removing everything, and when you keep the date the ZIP of a converted batch stamps each photo with the date it was taken, so the files still sort correctly after you unzip them. There is no account, no daily cap and no watermark. The trade-off is that the work happens on your own hardware, so an older machine takes longer.
Four we could not test, and why
- Convertio converted the file correctly but we could not retrieve the result on our connection — its download links are tied to the IP address that made the request, which our network does not keep stable. Not a fault of the tool.
- Adobe Express and Canva are free but the conversion runs inside their editor, which requires an account. We did not create one.
- Watermarkly and heic.online could not be driven through our automated test setup. Both may work perfectly well by hand.
What to check before you convert
- Decide whether the location should travel with the photo. This is the setting that actually matters and almost no converter asks you about it. If the photo is going somewhere public, strip it.
- If your library sorts by date, keep the date. A JPG with no date taken lands in your photo app as an undated file and sorts by when you imported it, which quietly scrambles an album.
- Check one converted photo against the original before doing a thousand. Open both side by side. Colour damage is obvious in a comparison and invisible on its own.
- Think about where the file goes. Most converters here upload your photos to a server and delete them on their own schedule. For holiday snaps that is a non-issue; for anything private, use a converter that runs in your browser.
Frequently asked questions
What is the best free HEIC to JPG converter?
For pure correctness, five of the six we tested are equally good: RedPanda Compress, iLoveIMG, CloudConvert, Picflow and heictojpg.com all preserved colour to within a fraction of a shade. Choose between them on the things that differ — whether your photos are uploaded, whether you want the location removed, and how many files you have.
Does converting HEIC to JPG lose quality?
A little, unavoidably: both are lossy formats, so the photo is decoded and re-encoded once. In our measurements every tool landed within about two decibels of the theoretical best, which is not visible. The differences that are visible come from colour handling, not from re-encoding.
Why is my JPG bigger than the HEIC it came from?
Because HEIC is simply a more efficient format — roughly twice as efficient at the same quality. A JPG that is larger than the original is normal and expected. What you get in exchange is a file that opens everywhere.
Will converting remove the GPS location from my photos?
Usually not. Four of the six converters we tested copied the GPS coordinates straight into the JPG. If you are converting photos in order to post them somewhere public, check — or use a converter that lets you remove the location deliberately.
Can I convert a whole camera roll at once?
Yes. heictojpg.com takes 200 at a time; the browser-based tools have no fixed limit and are bounded by your own machine’s memory instead. We ran 100 twelve-megapixel photos through two of them without a failure.
Conclusion
Most of these converters do the hard part correctly, and the one that doesn’t fails in a way you would never notice on your own. The real choice is not about quality at all — it is about two things nobody puts on the front page: whether your photos are uploaded to somebody else’s server, and whether the coordinates of your home travel inside the file you are about to share. Pick a tool that answers both the way you want, and check one photo before you convert a thousand. If you want the conversion to happen on your own machine and to decide for yourself what metadata survives, our HEIC to JPG converter is free and unlimited.

Fei is a skilled software engineer. He previously worked at Google and now at a startup. His expertise includes web media processing, cloud architecture, complex algorithms, and AI training and deployment. Beyond work, Fei enjoys diving into new knowledge and is a big fan of strategy games.
Leave a Reply