A growing number of video compressors promise that your file never leaves your computer. Instead of uploading the video to a server, they compress it inside the browser tab. That’s good for privacy and it means no upload wait, but “runs in your browser” covers some very different technology. We ran the same video through the four in-browser compressors that actually get search traffic and measured what came back.
Disclosure: this blog is published by RedPanda Compress, which is one of the four tools tested. It went through the same procedure as everyone else, and we report where it lost.
The short answer
- Best quality for a given file size: RedPanda Compress. It hit our 50 MB target exactly with a VMAF score of 84.0. The only tool that matched that quality needed a file 77% larger. The catch: it took 3 min 42 s, five to six times longer than the others.
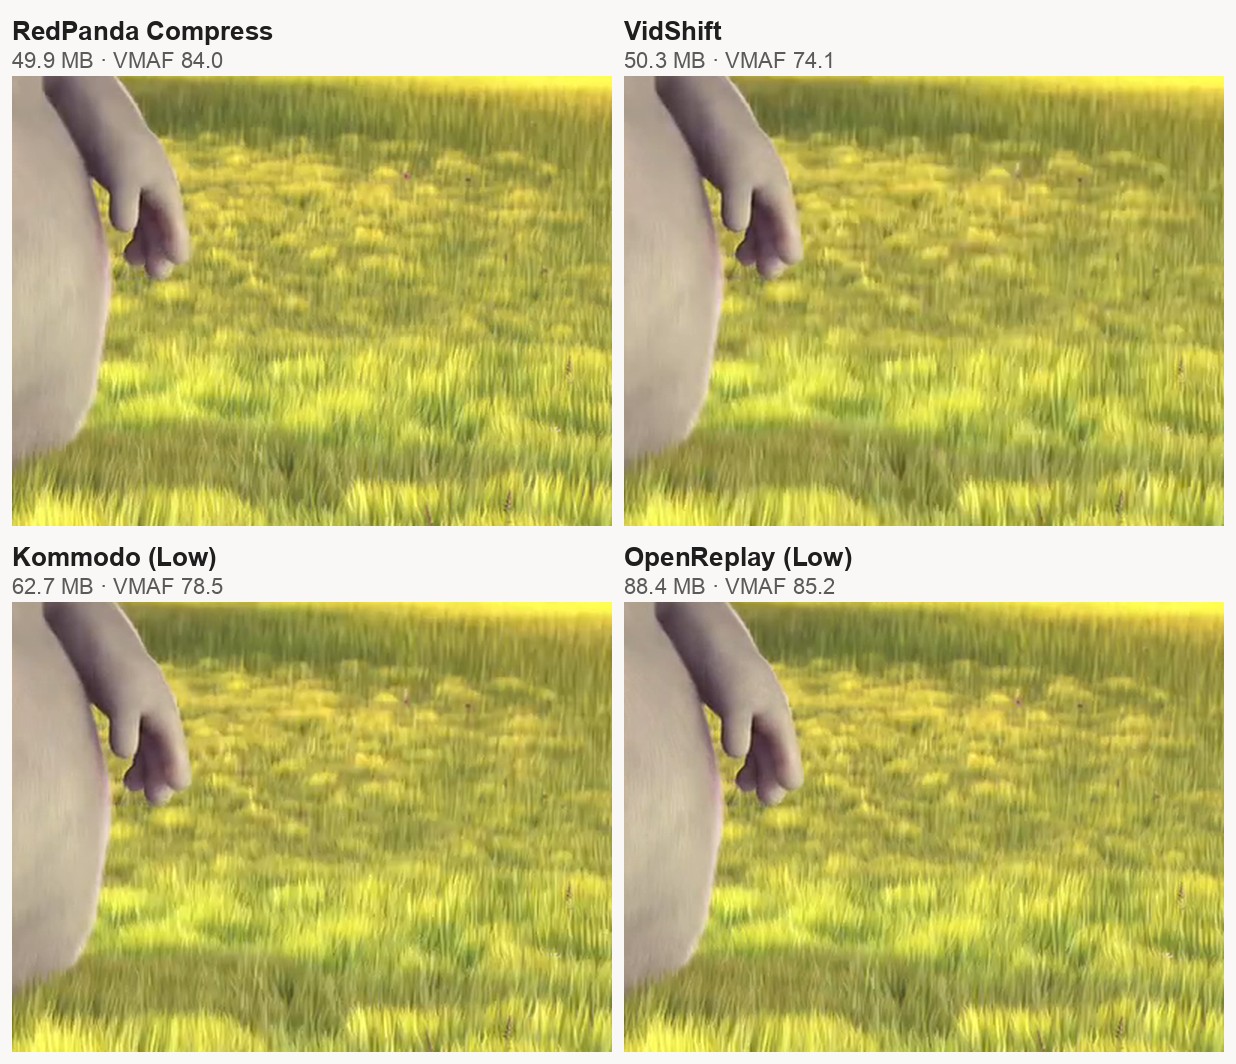
- Fastest with a size target: VidShift. 44 seconds to a 50 MB file, but at that size it scored lowest of the group (VMAF 74.1), a difference you can see.
- Fastest overall, best looking presets: OpenReplay. 35 seconds and good quality, but no size control: its smallest setting still produced an 88 MB file.
- Kommodo is just as fast and has resolution options, but it also has no size control, and its presets compressed less than they promise.
Two ways to compress video in a browser
All four tools keep the video on your device, but they encode it in one of two ways, and that choice explains almost every result below.
Hardware encoding (WebCodecs). VidShift, OpenReplay and Kommodo use WebCodecs, a browser feature that hands the video to the hardware encoder built into your computer’s graphics chip. Those encoders are designed for real-time jobs like video calls and screen recording. They are very fast, but they make simpler decisions about where to spend bits, so at the same file size they lose more detail. They also depend on what your browser and hardware support.
Software encoding (FFmpeg compiled to WebAssembly). RedPanda Compress runs FFmpeg with the x264 encoder inside the page, on your CPU. x264 is the same encoder used by most server-side compressors. It analyses each frame much more thoroughly, which costs time but gets more quality out of every megabyte. On a desktop computer it works the same in any modern browser because it doesn’t depend on the graphics chip. We explain the engine in more detail in how an in-browser converter actually works.
A note on RedPanda Compress on phones. Everything in this test ran on a desktop computer, where RedPanda Compress always uses the software encoder described above. On phones and tablets it also uses WebCodecs hardware encoding when the device supports it, because software x264 on a phone’s CPU would be slow and hard on the battery. It always does this for large files (200 MB and up) and for many smaller ones too, and if the hardware path fails on a particular file, it falls back to the software encoder. So on mobile, the speed-versus-quality trade-off in this article works in favour of speed.
How we tested
- Test file: Big Buck Bunny (Blender Foundation, CC-BY), the same file as our online video compressor comparison: 1280×720 at 24 fps, 9 min 56 s, H.264 + AAC, 158.6 MB. It’s openly licensed, so you can repeat the test yourself.
- Goal: about 50 MB, roughly a third of the original. If a tool accepts a target size, we typed 50 MB. If it only has presets, we ran its default and the preset closest to 50 MB.
- Tools: in-browser compressors with real search traffic (US organic visits per month, October 2026): VidShift (~18.7K), OpenReplay (~12.1K), Kommodo (~3.7K) and RedPanda Compress. The rest of the category gets close to zero visits, so we left it out.
- Time: from clicking the compress button to the finished file being ready.
- Quality: VMAF, Netflix’s open-source perceptual quality metric (0–100), comparing every frame of the output with the original. Roughly, a 2-point gap is hard to see and 6 or more is clearly visible.
- Upload check: we logged the size of every request each page made while compressing. None of the four sent anything over 1 MB, so all four do what they say: the video stays on your device.
- Machine: Apple M2 MacBook (8 cores, 16 GB), Chrome 154, plugged in, one tool at a time.
Results
| Tool and setting | Engine | Time | Output | VMAF |
|---|---|---|---|---|
| RedPanda Compress target 50 MB | x264 (CPU) | 3 min 42 s | 49.9 MB | 84.0 |
| VidShift custom 50 MB | WebCodecs (GPU) | 44 s | 50.3 MB | 74.1 |
| Kommodo Low, smallest preset | WebCodecs (GPU) | 35 s | 62.7 MB | 78.5 |
| OpenReplay Low, smallest preset | WebCodecs (GPU) | 35 s | 88.4 MB | 85.2 |
| Kommodo Medium, default | WebCodecs (GPU) | 40 s | 115.4 MB | 90.3 |
| OpenReplay Medium, default | WebCodecs (GPU) | 35 s | 134.4 MB | 91.7 |
All outputs stayed at 1280×720 and 24 fps and played as standard H.264 MP4s, with no watermarks. We ran RedPanda twice in different browser profiles (3 min 42 s and about 3 min 45 s, same size and score) and VidShift twice (42 and 46 s).
The table reads two ways. Sorted by speed, the hardware encoders win easily: 35–44 seconds against almost four minutes. Sorted by what you get per megabyte, it flips. OpenReplay needed 88 MB to slightly beat the quality RedPanda delivered at 50 MB, and VidShift, at the same 50 MB, was 10 VMAF points behind.
Averages can hide the bad moments, so we also counted the frames scoring below 70, roughly where damage becomes easy to spot. RedPanda: 8.8% of frames. OpenReplay (Low, 88 MB): 8.5%. Kommodo (Low): 21%. VidShift: 32%, about one frame in three.
Why the results look like this
To understand the gaps, we read each tool’s own page code to see what it asks the encoder for, and we looked inside every output file to see how the encoder actually built it. Three things explain almost everything.
| RedPanda | VidShift | Kommodo | OpenReplay | |
|---|---|---|---|---|
| Encoder | x264, software (CPU) | Hardware, via WebCodecs | Hardware, via WebCodecs | Hardware, via WebCodecs |
| How the bitrate is chosen | From the size you type | From the size you type | Fixed per preset and resolution | Fixed per preset and resolution |
| B-frames (share of frames) | 67% | none | none | none |
| Full keyframe every | ~5.6 s, placed at scene cuts | 5 s | 2 s | 2 s |
| Frames encoded per second | ~65 | ~325 | ~410 | ~410 |
Frame structure measured on the first two minutes of each ~50–90 MB output. Frames per second = 14,315 frames ÷ total time.
1. The hardware encoders skip B-frames
Most frames in a compressed video are stored as differences from other frames. P-frames borrow only from frames before them; B-frames can borrow from frames before and after, which usually makes them far cheaper. In RedPanda’s file, two out of three frames are B-frames, averaging about 1 KB each. The three hardware-encoded files contain no B-frames at all, so every frame is a P-frame costing 2.6–4.2 KB. With the same 50 MB budget, the software encoder has more bits left over for the frames that matter.
2. Keyframes are expensive, and two tools insert one every two seconds
A keyframe is a complete picture that doesn’t borrow from anything, so it’s many times bigger than the frames around it. Kommodo and OpenReplay start a new keyframe every 2 seconds, which takes about 20% of their bit budget. RedPanda’s encoder places keyframes mostly where the scene actually changes, about every 5.6 seconds on this film, and spends around 17% on them.
3. Software encoding plans ahead; hardware encoding works frame by frame
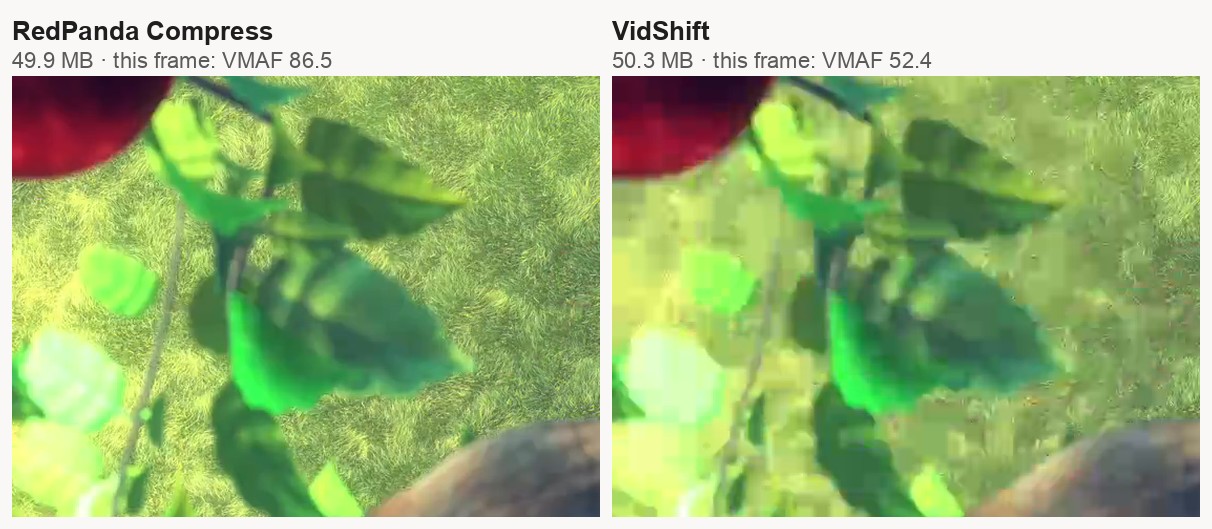
x264 looks 20 frames ahead before deciding how to spend bits, and gives more detail to parts of the picture that later frames will reuse, so the effort is spent once and repaid many times. It also tries several ways of predicting each block before picking one. The video encoders built into graphics chips are designed mainly for real-time jobs like video calls and screen recording, where there’s no time to look ahead. That makes them five to six times faster here, but at the same size they keep less detail, and the loss concentrates in busy scenes like grass and leaves.
The flip side explains RedPanda’s speed. All that analysis is real work, and in a browser it runs as WebAssembly on your CPU. That’s much faster than it used to be, with multiple threads and SIMD instructions, but it still can’t use the hand-tuned assembly code x264 relies on in desktop apps, and decoding the input happens in software too. The hardware tools can hand both decoding and encoding to the chip’s dedicated video circuits.
How each tool works, and where its problems come from
RedPanda Compress
How it works: on a desktop computer, it runs FFmpeg, compiled to WebAssembly, in your browser tab and encodes with x264. You type a size, and it works out the bitrate that fits: (50 MB − the audio) ÷ the video’s length gave 541 kbps here. It then asks x264 for that bitrate at a steady rate, with a few seconds of buffer so busy scenes can borrow from quiet ones.
Strengths: the best quality per megabyte in this test, and the size you type is the size you get (49.9 MB for a 50 MB target), which matters when an email, app or upload form has a hard limit. On desktop it doesn’t need WebCodecs or a particular graphics chip and accepts files up to 8 GB, and on phones it switches to hardware encoding where the device supports it. The output is always plain H.264 MP4.
Weaknesses, and why: it’s the slowest by far, 3 min 42 s on this file, about 2.7× faster than real time. That’s the cost of software encoding described above: x264’s analysis running as WebAssembly on the CPU. It also keeps the CPU busy for the whole job, so a laptop’s fans will spin up, and older or lower-power computers will take noticeably longer. (On phones, where this would hurt most, it uses the hardware encoder instead, as described above.)
VidShift
How it works: it uses Mediabunny, an open-source library, to drive the browser’s WebCodecs hardware encoder. For a custom size, it computes a bitrate aimed at 97% of your target, as a safety margin, and asks the hardware encoder for a constant bitrate. Its presets are fractions of the source’s own bitrate (70%, 40% or 20%).
Strengths: the only hardware-based tool here that takes a target size, and it lands close (50.3 MB for 50 MB). It’s fast (44 s) and the most-visited tool in this group.
Weaknesses, and why: at the same 50 MB it scored lowest (VMAF 74.1), and about one frame in three fell below 70. Constant bitrate is what makes the size predictable, but it also means a busy scene gets no more bits than a still one. Combined with the hardware encoder’s lack of B-frames and look-ahead, the busy scenes are where it breaks up (see the second image above). It also came out slightly over target, by about 0.5%, so for a hard limit, type a little less than the limit.
OpenReplay
How it works: WebCodecs hardware encoding in a background worker. Its quality presets don’t look at file size at all. The bitrate is a fixed formula of the output resolution: width × height × 30 × 0.045 for Low, 0.075 for Medium and 0.12 for High, capped at 95% of the source’s bitrate. At 720p that’s 1.24 Mbps for Low and, after the cap, 2.02 Mbps for Medium. It asks for that as a variable bitrate.
Strengths: the fastest tool (35 s) and the best-looking files, because its presets are generous. Medium scored 91.7.
Weaknesses, and why: since the bitrate comes from the resolution, not from a size you choose, it can’t target a size. Low will always be about 1.2 Mbps at 720p, so a 10-minute video can’t go below ~88 MB unless you lower the resolution. On our file, Medium asked for 95% of the source’s bitrate, so it barely compresses. Nearly all of the 15% it saved came from the hardware encoder delivering about 20% less than it was asked for (Kommodo’s files came in 20% under in exactly the same way). The page’s size estimate, about 153 MB, matches what Medium requests rather than what the encoder delivered, and it didn’t change when we switched quality levels. Separately, the audio came out at about 189 kbps, higher than both the source (~130 kbps) and the 128 kbps its code requests.
Kommodo
How it works: it also uses Mediabunny and the WebCodecs hardware encoder (the page shows “Encoder: AVC (Hardware)”). Each preset is a fixed bitrate for 1080p (8, 4 or 2 Mbps for High, Medium and Low), scaled down by pixel count for smaller resolutions: 1.78 Mbps for Medium and 0.89 Mbps for Low at 720p. It’s capped just below the source’s own bitrate and requested as a variable bitrate.
Strengths: fast (35–40 s), simple, and it lets you pick a lower resolution, the most effective way to shrink a file if you can accept fewer pixels.
Weaknesses, and why: no target size, and the labels (“~50%”, “~70% compression”) are fixed text that doesn’t depend on your video. Because the bitrate is fixed per resolution, the saving depends entirely on how big the source already was. Our 720p source was 2.1 Mbps, so Medium’s 1.78 Mbps saved only 27%, and Low saved about 60%. On a typical phone video, recorded at a much higher bitrate, the same presets would save more than the labels say. Like OpenReplay, the hardware encoder delivered about 20% under the requested bitrate, and a keyframe every 2 seconds eats into the budget, which is why Low’s 62.7 MB looked worse (78.5) than RedPanda’s 50 MB. Its FAQ also says it doesn’t work on iPhone, because Safari’s WebCodecs support is limited.
Which one should you use?
| If you need… | Use |
|---|---|
| To get under a hard size limit (email, Discord, a form) with the best quality | RedPanda Compress |
| A size target, and speed matters more than detail | VidShift |
| A modest reduction with almost no visible loss, fast | OpenReplay (Medium) or Kommodo (Medium) |
For short clips the speed gap matters less in absolute terms: RedPanda processed this 720p film at about 2.7× real time, so a one-minute 720p clip takes around 20–25 seconds on a machine like ours, against a few seconds for the hardware tools. It matters most with long recordings. If the file is going somewhere with a size limit, though, quality per megabyte is the number that decides how good it looks when it gets there.
FAQ
Can I compress a video online without uploading it?
Yes. All four tools in this test compress the video inside your browser tab, and we confirmed none of them sent the file anywhere. You can check any tool yourself with your browser’s developer tools; we show how in Are Online File Converters Safe?
Why are in-browser compressors so different in speed?
It comes down to the encoder. Tools built on WebCodecs use the hardware video encoder in your computer’s graphics chip, which is fast but less efficient. Tools built on FFmpeg/WebAssembly run a software encoder on your CPU, which is slower but squeezes more quality into each megabyte.
Are in-browser compressors worse than server-based ones?
Not necessarily. In our comparison of upload-based compressors, the best server tool scored 85.3 at about 48 MB, close to RedPanda’s 84.0 at 50 MB, but it required uploading the whole file first. The hardware-encoding browser tools trade some quality for speed instead.
Will these results be the same on my computer?
The quality and size numbers should be very close, because they come from the encoders’ settings. The times will vary: software encoding scales with your CPU, and hardware encoding depends on your graphics chip and browser. On an older laptop, expect all of them to be slower, and the software encoder more so.
The bottom line
Every tool here keeps your video private. The real choice is between speed and quality per megabyte. If you need a file to fit under a limit and still look good, try RedPanda Compress: type the size you need and it compresses the video on your own device, with no upload, no watermark, and a standard H.264 MP4 at the end. If you just want a quick, moderate reduction, the hardware-based tools will get you there in under a minute.

Fei is a skilled software engineer. He previously worked at Google and now at a startup. His expertise includes web media processing, cloud architecture, complex algorithms, and AI training and deployment. Beyond work, Fei enjoys diving into new knowledge and is a big fan of strategy games.